Creative DIY Storage Ideas for Closet-less Spaces. Having ample storage space is a common desire for homeowners, with his-and-her closets being the ultimate dream. However, what should you do if you have a room without a closet altogether?
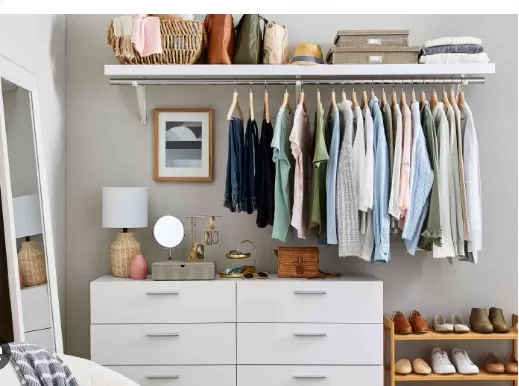
Before considering expensive alternatives like freestanding closets or armoires, it’s worth exploring the idea of leaving your clothes out in the open. Living without a closet encourages you to declutter your wardrobe, preventing outdated or ill-fitting clothes from accumulating behind closed doors. Moreover, open storage can transform your clothing into an artistic display. From simple-to-assemble pipe fixtures to imaginative and avant-garde designs, there are numerous creative storage solutions available. These alternatives will make you question why you ever wanted a conventional closet in the first place. Embracing open storage not only solves your storage needs but also adds a unique aesthetic touch to your space.
Creating a Stylish and Functional Headboard Closet

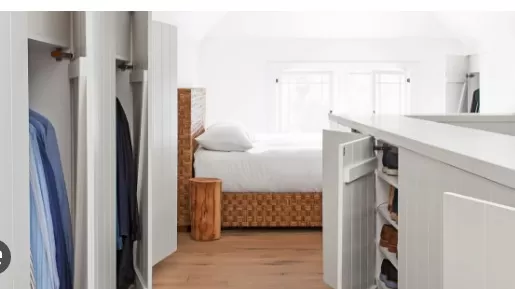
For a unique and practical twist, consider incorporating an open closet behind the head of your bed.
This clever design not only serves as a focal point but also adds a pop of color and provides additional storage space. Here’s how you can re-create this look for yourself:.
Install Closet Rods: Place tall shelving units on either side of your bed, leaving enough space for you to comfortably access the closet.
Install closet rods between the shelving units at a suitable height. These rods will serve as hanging space for your clothes and can accommodate clothing items such as shirts, dresses, or jackets.
Incorporate Shelf Space: Install a shelf above the closet rods to unify the setup and provide additional storage.
This shelf can be used to store folded clothes, accessories, or decorative items. Ensure the shelf is securely anchored to the wall for stability.
Choose Color and Style: Select a color for the shelving units and shelf that complements the overall color scheme of your room.
Opt for a pop of color to create visual interest, or choose a tone that harmonizes with the existing decor. Consider materials and finishes that align with your desired style, whether it’s modern, rustic, or eclectic.
Organize and Style: Organize your clothing and accessories on the closet rods and shelves, keeping items neatly arranged and easily accessible.
Use storage boxes, baskets, or dividers to further maximize space and maintain an organized appearance. You can also add decorative elements, such as plants, artwork, or stylish storage containers, to personalize and enhance the overall aesthetic.
Lighting and Accessories: Install appropriate lighting to ensure visibility and create a visually appealing atmosphere within the headboard closet area.
Consider incorporating LED strip lights or small wall sconces for functional and ambient lighting. Additionally, you can adorn the shelving units and shelf with decorative items like framed photos, books, or small decor pieces to add a personal touch.
By incorporating an open closet as a headboard feature, you not only create a striking focal point but also optimize storage and organization in your bedroom.
This unique design element adds both style and functionality, making it a practical solution for maximizing space in a creative and visually appealing way.
Creating a Stylish Clothes Rack with Mixed Materials
For a funky and eye-catching clothes rack, consider juxtaposing copper and concrete to create a stunning combination of materials.
Follow these steps to create your own unique closet coup d’état:.
Gather Materials: You will need copper pipes, connectors, buckets, wet concrete mix, a mixing container, a measuring cup, a concrete release agent (optional), a level, and protective gear like gloves and goggles.
Assemble the Copper Frame: Measure and cut the copper pipes to your desired length using a pipe cutter or a hacksaw.
Connect the pipes using appropriate connectors to form a U shape. Ensure the structure is stable and level.
You can use copper adhesive or soldering for added stability, if desired.
Prepare the Concrete: Follow the instructions on the wet concrete mix to prepare the concrete mixture in a mixing container.
Add water gradually and mix thoroughly until you achieve a smooth consistency. Optionally, use a concrete release agent on the buckets to facilitate easy removal later.
Pour Concrete into the Buckets: Place the U-shaped copper frame on a level surface and position the buckets at each end.
Pour the wet concrete mixture into the buckets, ensuring that the frame remains centered and level. Use a level to check the alignment.
Fill the buckets almost to the top, leaving a small space for expansion.
Allow Concrete to Cure: Let the concrete cure according to the manufacturer’s instructions.
This typically takes a few days. During this time, ensure the structure remains undisturbed and protected from moisture.
Unmold the Concrete: Once the concrete has fully cured, carefully remove the buckets by gently tapping or flexing them.
If you used a release agent, the concrete should come out easily. If necessary, you can use sandpaper to smooth any rough edges or imperfections.
Finalize the Clothes Rack: Place the freestanding concrete structure in your desired location and hang your clothes, jackets, and accessories on the copper frame.
Adjust the positioning of the clothing items to achieve the desired aesthetic.
This mixed-material clothes rack creates a sleek and industrial look, combining the warmth of copper with the ruggedness of concrete.
It offers a unique and stylish storage solution for your clothing, while adding a touch of creativity and design flair to your space.
Elevating Hangers: Sculptural Clothing Storage Idea

Transforming ordinary hangers into an imaginative and visually striking storage solution can add a unique touch to your space.
Follow these steps to create a floating, sculptural statement using retooled hangers:.
Gather Materials: You will need wooden hangers, twine or sturdy string, scissors, a ceiling hook, and a measuring tape.
Prepare the Hangers: Start by removing the hook from each wooden hanger.
You can do this by unscrewing or carefully cutting it off, leaving a small loop or hole at the top.
Cut and Attach Twine: Measure and cut a length of twine for each hanger, ensuring it’s long enough to reach from the ceiling to your desired hanging height.
Thread one end of the twine through the loop or hole in the hanger, and tie it securely. Repeat this process for each hanger.
Install Ceiling Hook: Locate a suitable spot on the ceiling where you want to hang your sculptural clothing storage.
Use a measuring tape to ensure it’s centered and at the desired height. Install a sturdy ceiling hook securely, following the manufacturer’s instructions.
Hang the Hangers: Take the loose ends of the twine attached to each hanger and tie them to the ceiling hook.
Adjust the lengths of the twine as needed to create an aesthetically pleasing arrangement. You can experiment with different lengths and heights to achieve the desired visual effect.
Organize Your Attire: Once the hangers are securely suspended, you can begin hanging your clothing items on them.
Create clusters of hangers to hold a week’s worth of attire, arranging them in a visually pleasing and practical way.
This reimagined hanger storage idea creates a sculptural and floating display for your clothes, adding an artistic element to your space.
It provides a unique storage solution while freeing up floor space and showcasing your wardrobe in an imaginative way. Get creative with the arrangement and mix and match hangers for added visual interest.
Versatile Rolling Clothes Rack: Functional and Portable
A small rolling clothes rack offers flexibility and convenience, serving various purposes from planning outfits to providing extra storage space.
Here’s how you can create your own using pipes and a wood board:.
Gather Materials: You will need pipes (such as metal or PVC), floor flanges, screws, a thick wood board, casters with locks, a drill, and necessary protective gear.
Measure and Cut the Pipes: Determine the desired dimensions for your clothes rack.
Measure and cut the pipes accordingly, considering the length and width of the wood board and the height you prefer for hanging clothes.
Assemble the Frame: Attach floor flanges to the ends of the pipes, ensuring they are securely fastened.
Position the pipes vertically on the wood board, aligning them evenly along one side. Mark the locations for drilling pilot holes to attach the flanges to the board.
Drill pilot holes and then screw the flanges onto the wood board.
Install Casters: Attach casters to the bottom corners of the wood board, ensuring they are evenly spaced.
Use casters with locks to secure the clothes rack in place when needed.
Finishing Touches: Sand the wood board to create a smooth surface.
You can paint or stain the board for a desired aesthetic. Apply a protective finish to the wood, if desired, to ensure durability and longevity.
Test and Adjust: Once the construction is complete, test the rolling clothes rack to ensure it moves smoothly and securely.
Make any necessary adjustments, such as tightening screws or adjusting caster positions, to achieve optimal functionality.
This rolling clothes rack provides a portable and versatile solution for organizing your wardrobe.
It can be stored anywhere and easily rolled out when needed. Use it for planning outfits, hanging coats, or providing additional storage space in various seasons.
Note: Consider the weight capacity of the pipes and casters to ensure they can support the clothing items you plan to hang.
Regularly check the stability and condition of the clothes rack to maintain its functionality and safety.
Gravity-Defying Metal Clothing Rack: Hanging Storage Solution

For a unique and visually captivating clothing storage solution, consider creating a metal clothing rack that hangs from the ceiling, seemingly defying gravity.
Here’s how you can achieve this stylish and functional design:.
Gather Materials: You will need metal pipes (such as copper or steel), rope or strong cord, ceiling hooks, hangers, and optional tools such as a pipe cutter, pliers, and a drill.
Design the Rack: Determine the desired length and configuration of your clothing rack.
For additional storage, consider creating a two-tiered design with two horizontal pipes at different heights. Measure and cut the metal pipes to the desired lengths using a pipe cutter, ensuring they fit your space and accommodate your clothing needs.
Install Ceiling Hooks: Locate suitable positions on the ceiling where you want to hang the clothing rack.
Use a drill and appropriate hardware to install sturdy ceiling hooks securely. Ensure the hooks are aligned with the desired positioning of your rack.
Thread the Rope: Cut a length of rope or strong cord that can comfortably reach from the ceiling to the desired height of your clothing rack.
Thread the rope through the U-shaped metal piping, ensuring it is centered and balanced. Tie knots or secure the rope tightly to prevent slippage.
Hang the Clothing Rack: Attach one end of the rope to the ceiling hook, adjusting the length of the rope as needed to achieve the desired height for your clothing rack.
Repeat the process for each section of the clothing rack, ensuring that the pipes are securely hanging from the rope and evenly balanced.
Organize and Style: Hang clothing items from hangers on the bottom pipe, utilizing it for hanging storage.
On the top pipe, fold and drape clothing that doesn’t require hanging, such as scarves, blankets, or accessories. Arrange your clothing in an aesthetically pleasing and practical manner.
This gravity-defying metal clothing rack creates a striking visual impact while providing functional storage for your clothing.
It can be customized to fit your space and needs, offering a unique and artistic element to your room. Consider using different finishes or materials for the metal pipes to match your desired style and aesthetic.
Note: Ensure the ceiling hooks and rope are securely installed and can support the weight of the clothing items.
Regularly check the stability and condition of the clothing rack to ensure safety and prevent any accidents.
*The information is for reference only.