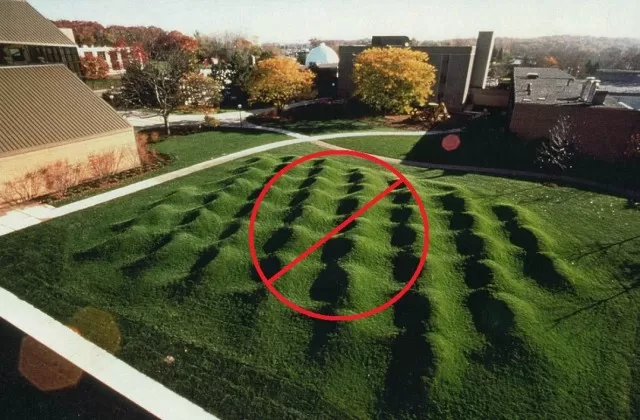
Leveling your yard: 7 Easy Steps. Do you find your yard filled with bumps and uneven terrain? Don’t fret!
By learning how to level your property, you not only enhance its appearance but also safeguard your home’s foundation and basement from potential Water Damage. Discover simple yet effective techniques to achieve a smooth and even landscape that will leave you worry-free.
Step 1: Trim Your Lawn

Begin by giving your lawn a proper trim.
However, be cautious not to cut it too short, as this may result in scalp marks. Ideally, you should maintain a length where the grass blades are visible but not excessively exposed, as this helps protect against drying out.
Step 2: Assess Thatch Buildup and Perform Dethatching
Inspect the condition of your lawn’s roots and determine the presence of thatch.
Thatch refers to the layer of decomposed grass and organic matter at the turf’s base. It’s important to maintain a thatch layer of around ¼ to ½ inch, as anything beyond that can hinder proper air and water circulation. If you notice an excess of thatch, take action by either manually using a thatch rake to remove or loosen it systematically. For larger lawns, consider utilizing a dethatching machine, which can be rented from a home improvement store for more efficient results. By dethatching, you promote better lawn health and vitality.
Step 3: Create a Balanced Top-Dressing Mix

Prepare a top-dressing mixture to address sunken areas in your lawn by combining two parts sand, two parts topsoil, and one part compost.
This mixture serves multiple purposes in leveling your yard effectively. The sand aids in maintaining a stable and compact-free terrain, while the topsoil and compost supply essential nutrients that promote healthy grass growth.
By incorporating this well-rounded mixture, you provide the ideal conditions for your lawn to thrive.
Step 4: Address Sunken Areas by Removing Grass and Filling with Soil Mixture
For any noticeable low spots or depressions exceeding a depth of 2 to 3 inches, it is necessary to excavate the grass covering the affected areas.
Follow these steps to proceed:Position the blade of a shovel on the outer edge of the low spot. Carefully slide the shovel downwards and underneath the grass roots, digging approximately 2 to 3 inches deep. Use the shovel to pry the grass gently, exposing the underlying soil. Fill the excavated hole with the previously prepared top-dressing mix. Replace the grass, carefully aligning it back into its original position on top of the filled area. This process ensures that the sunken parts are adequately filled, contributing to a more even and level yard surface.
Step 5: Apply a Thin Layer of Soil Mixture to Level the Entire Lawn

After filling the lowest patches, it’s time to achieve overall evenness by spreading the remaining top-dressing mix across your entire lawn.
follow these steps:Use a shovel to evenly distribute the top-dressing mixture across the lawn’s surface. Aim for a depth of approximately ¼ to ½ inch when applying the mix.
It’s better to err on the side of caution and keep the layer thin to avoid suffocating the grass. Ensure that the mix is spread uniformly, covering any uneven areas in the process.
By applying a thin layer of the soil mixture, you promote a more level and balanced lawn surface. If necessary, refer to Step 7 to repeat the process for adding a second layer.
Step 6: Activate Lawn Sprinklers for Proper Settling and Nutrient Infusion
To facilitate the settling of the top-dressing mix into the grass and eliminate any air pockets, it is crucial to water your lawn.
Follow these steps:Activate your lawn sprinklers to evenly distribute water across the entire area. Allow the water to thoroughly penetrate the top-dressing mix and reach the grass roots. This watering process aids in the proper integration of the mix with the existing grass, ensuring a more seamless and leveled appearance. Additionally, the moisture from the sprinklers helps kick-start the infusion of nutrients from the compost in the mix, promoting the overall revitalization of your lawn. By running the lawn sprinklers, you provide essential hydration and nutrient replenishment for a healthier and more vibrant lawn.
Step 7: Reapply Soil Mixture as Required
After a few watering sessions, observe the condition of your lawn for any signs of water runoff or standing water in puddles.
Depending on the outcome, you may need to make additional applications of the top-dressing mix to achieve a fully smooth lawn. Follow these steps:Keep an eye out for any areas where water runoff or standing water is present after watering. If needed, proceed with a second application of the top-dressing mix to further level out the lawn. Repeat Steps 5 and 6 for applying the second layer and running the sprinklers to aid in settling and nutrient infusion. Time the second application when the grass shows active growth or when the initial top-dressing layer becomes less visible. By reapplying the soil mixture as required, you ensure thorough leveling and address any remaining unevenness, resulting in a beautifully uniform lawn.
*The information is for reference only.