Refreshing Shower Hacks: Quick Fixes for Revitalization. After a long day or when you’re seeking an energizing start, a refreshing bath or shower should be a sanctuary of relaxation.
However, certain obstacles like mold, delayed warm water, or damp towels can quickly dampen the mood. Don’t worry though, as there are solutions to these common challenges that can help you create an optimal bathing experience. Let’s address each issue individually:
Enhancing and Boosting Water Pressure in Your Shower: Effective Techniques and Tips

To optimize the water pressure in your shower, it’s essential to address potential mineral deposits that might obstruct the flow.
Follow these steps to not only increase the water pressure but also ensure a refreshing and invigorating shower experience. .
Step 1: Loosen Mineral DepositsTo begin, you need to remove any mineral deposits that could be causing blockages.
Start by unscrewing the shower head carefully. If it comes off easily, proceed to step 2.
However, if it’s challenging to detach, don’t worry; there’s an alternative method explained in step 3.
Step 2: Soak the Shower HeadTake the detached shower head and prepare a bowl of boiling water.
Add half a cup of vinegar to the boiling water and place the shower head in the mixture. Allow it to soak for approximately 10 minutes.
This vinegar solution will effectively dissolve the mineral deposits that have accumulated inside the shower head.
Step 3: Alternative Method for Fixed Shower HeadsIn case you are unable to remove the shower head, there’s still a way to address the mineral deposits.
Fill a plastic bag with undiluted vinegar, ensuring it’s sufficient to cover the shower head entirely. Carefully tape the bag filled with vinegar over the shower head fixture, ensuring a tight seal.
Leave it in place for about an hour to allow the vinegar to penetrate and dissolve the mineral deposits.
Step 4: Rinse and ReassembleAfter the soaking period is over, remove the shower head from the vinegar solution or remove the vinegar-filled bag if using the alternative method.
Rinse the shower head thoroughly with water to eliminate any remaining vinegar and mineral deposits. Reattach the shower head firmly, ensuring a secure fit.
By following these steps, you’ll successfully eliminate mineral deposits that hinder water flow, thereby boosting the water pressure in your shower.
Enjoy the revitalizing experience of a powerful and invigorating shower once again.
Transform Your Shower into a Karaoke Stage: Amplify Your Showertime Fun
Introducing an exciting way to take your shower experience to the next level: Showertime Karaoke! With a simple hack and a ceramic mug, you can enjoy the amplified sound of your favorite tunes as you sing your heart out.
Follow these steps to create your own mini karaoke stage in the bathroom:.
Step 1: Prepare Your Smartphone or MP3 PlayerGrab your trusty smartphone or MP3 player loaded with your favorite karaoke tracks.
Ensure that the speaker end is facing downward to maximize the sound projection.
Step 2: Utilize a Ceramic MugFind a ceramic mug from your kitchen or any other suitable container that can hold your device securely.
The ceramic material helps amplify the sound waves, creating a fuller audio experience.
Step 3: Position the Mug on a LedgeLocate a sturdy ledge in your bathroom, ideally close to where you shower.
Ensure it’s a safe and dry spot where the mug won’t accidentally fall or get wet. Place the ceramic mug on the ledge with the speaker end of your device facing down into the mug.
Step 4: Rock Out to Your Favorite TunesNow it’s time to unleash your inner rockstar! Play your chosen karaoke tracks on your smartphone or MP3 player, and let the sound fill the room.
The ceramic mug acts as a natural amplifier, enhancing the audio quality and creating a captivating shower karaoke experience.
Step 5: Sing Your Heart OutWith the amplified sound enveloping your shower space, sing along to your favorite songs with confidence and enthusiasm.
Let the music inspire you as you enjoy a truly immersive and entertaining showertime karaoke session.
Remember to exercise caution when handling electronic devices near water, and make sure your smartphone or MP3 player is securely positioned in the mug.
As an additional tip, adjust the volume to a level that suits your preferences and be considerate of others in your household.
With this simple yet effective trick, you can transform your shower into a personal karaoke stage, allowing you to unleash your inner performer and make every shower an unforgettable experience.
So grab your microphone (or shampoo bottle) and get ready to rock the bathroom like never before!.
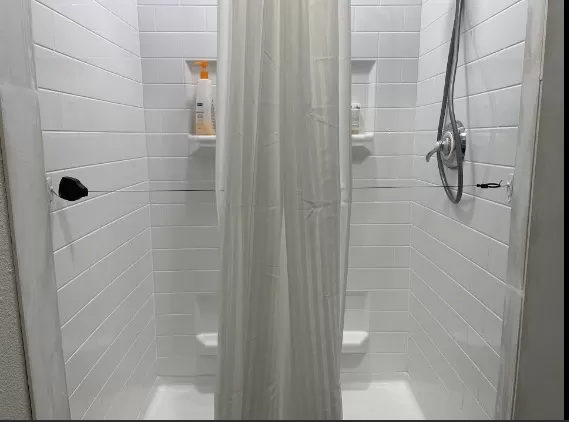
Prevent Shower Curtain Cling: Maintain Privacy and Comfort

If you’re tired of dealing with a shower curtain that constantly clings to you while you shower, there are effective methods to put an end to this annoyance.
By utilizing a weighted curtain or implementing a do-it-yourself solution, you can ensure that your shower curtain stays in place. Follow these steps to prevent shower curtain cling:.
Step 1: Acquire a Weighted Shower Curtain Consider purchasing a specially designed weighted shower curtain.
These curtains typically have built-in weights at the bottom, which help keep them in position and prevent them from blowing inward during a shower. Look for options labeled as “weighted” or “magnetic” shower curtains when shopping.
Step 2: DIY Magnetic Solution If you prefer a do-it-yourself approach, you can use heavy-duty magnets to secure the bottom of your shower curtain to the side of your bathtub.
Choose magnets that have sufficient strength to hold the curtain in place. Smaller magnets may slide, so opt for larger, more robust ones.
Attach the magnets evenly spaced along the bottom edge of the curtain.
Ensure they are secured tightly to prevent them from moving or falling off during showering. The magnets will create a magnetic connection between the curtain and the side of the tub, keeping it in position.
Step 3: Utilize Binder Clips Another DIY option is to take a handful of binder clips and attach them along the bottom edge of the shower curtain, evenly spaced.
Make sure the binder clips are secure and won’t easily detach. The weight of the clips will help weigh down the curtain, preventing it from clinging and ensuring it stays in place.
Step 4: Enjoy Cling-Free Showers With the weighted curtain or DIY solution in place, you can now enjoy showering without the annoyance of a clingy curtain.
The added weight or magnetic connection will keep the curtain neatly arranged and maintain your privacy and comfort throughout your showering experience.
Choose the method that best suits your preferences and needs.
Whether you opt for a weighted curtain or decide to create your own solution using magnets or binder clips, these simple adjustments will eliminate the frustration of a shower curtain that clings, allowing you to shower in peace.
Note: When using magnets or binder clips, be cautious not to scratch or damage any surfaces.
Organize Your Shower Essentials: Optimize Space and Convenience
When it comes to storing your shower gels and toiletries, finding the right spot can make a significant difference in your Daily Routine.
Say goodbye to soggy bottles and awkward reaching by following this simple tip to sort out your shower gels effectively:.
Step 1: Assess Your Shower SpaceTake a moment to evaluate your shower area and identify the most accessible and convenient spot to hang your basket of shampoo, body wash, and other essentials.
While the neck of the shower head might seem like the obvious choice, it can result in wet bottles and inconvenience when reaching for specific items.
Step 2: Choose an Alternative LocationInstead of using the shower head neck, consider installing a towel hook at the opposite end of the shower.
This strategic placement will provide a more suitable and easily accessible spot for hanging your basket or caddy.
Step 3: Install the Towel HookSelect a towel hook that can be securely attached to the shower wall.
Make sure it is positioned within reach, allowing you to conveniently grab your shower gels without straining or getting water in your eyes.
Step 4: Hang Your Shower EssentialsOnce the towel hook is securely in place, hang your basket or caddy containing your shampoo, body wash, and other items on the hook.
This location will keep your supplies within easy reach and prevent them from getting wet during showers.
Step 5: Enjoy Enhanced Shower OrganizationWith your shower gels now neatly organized in a more convenient spot, you’ll no longer have to struggle with wet bottles or worry about searching for specific products.
Everything will be within arm’s reach, allowing you to streamline your shower routine and have a more enjoyable bathing experience.
By implementing this simple adjustment, you can maximize the efficiency and tidiness of your shower space, making it easier to find and use your shower gels and toiletries.
Say goodbye to sopping wet bottles and hello to a well-organized and hassle-free shower experience.
Convenient and Space-Saving Towel Placement: Easy Access and Enhanced Storage

Imagine stepping out of a refreshing shower and having a dry towel within arm’s reach.
By implementing a simple towel placement adjustment, you can ensure that you always have a towel readily available while optimizing your bathroom’s storage space. Follow these steps to achieve this practical and efficient towel setup:.
Step 1: Assess Your Bathroom LayoutTake a moment to evaluate your bathroom and identify the ideal spot for placing a second towel rod.
Look for a location that is easily accessible and won’t interfere with other fixtures or furnishings.
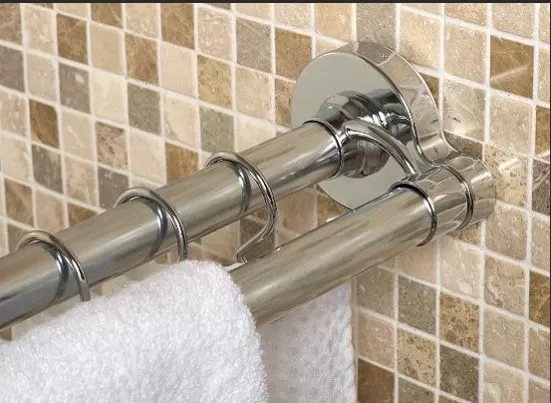
Step 2: Acquire an Extra Tension Rod or Double RodObtain either an additional tension rod or a double rod, depending on your preference and the available space in your bathroom.
You can find these at most home improvement or department stores. The tension rod can be a convenient choice if you want a temporary and easy-to-install option, while a double rod provides a more permanent solution.
Step 3: Position the Second Towel RodInstall the extra tension rod or replace your current rod with a double rod.
The second rod should be placed outside of your shower curtain, within easy reach of where you typically step out of the shower. Ensure that it is securely mounted to provide stability and support for your towels.
Step 4: Hang and Arrange Your TowelsOnce the second rod is in place, hang your towels on the rods, keeping them within reach and conveniently located for immediate use after showering.
This setup ensures that you no longer have to stretch or search for a towel, as it will be easily accessible and kept dry outside the shower.
Step 5: Utilize the Freed Wall SpaceWith your towel now within reach, the wall space that was previously occupied by the towel can be utilized for additional storage.
Consider adding shelves, hooks, or other storage solutions to keep your bathroom essentials organized and easily accessible.
By incorporating a second towel rod outside your shower curtain, you’ll enjoy the convenience of always having a dry towel at hand while optimizing your bathroom’s storage potential.
Say goodbye to reaching or fumbling for a towel and embrace a well-organized, efficient, and comfortable post-shower experience.
*The information is for reference only.