Timeless Car Maintenance Hacks for All Drivers.Who says you need to rely solely on mechanics for your car maintenance needs? You’ll be surprised to learn that many common car issues can be resolved with simple DIY fixes using items you probably already have at home.
No need to rush to the repair shop for every little problem; take matters into your own hands with these tried-and-true solutions:By taking on these DIY car maintenance fixes, you’ll not only save money on unnecessary trips to the mechanic but also gain a sense of empowerment knowing you can handle these issues yourself. So, raid your household supplies and embark on a journey of self-sufficiency, making your car shine inside and out!
Easy Steps for Significant Savings: Discover Time-Tested DIY Car Maintenance Hacks Your Grandfather Swore By!

Maintaining your vehicle is a crucial aspect of ensuring its optimal performance and longevity.
However, in today’s fast-paced world filled with an overwhelming array of car maintenance products, staying on top of your vehicle’s needs can be quite challenging. While you might consider frequent visits to the mechanic and spending a fortune on expensive products, there’s an alternative that has withstood the test of time – tried-and-true DIY solutions that your grandfather relied on to keep his car running smoothly.
In this article, we’ll unveil a treasure trove of car maintenance tricks passed down through generations – timeless tips that not only require minimal time and effort but also promise significant savings.
Embracing these easy-to-follow steps can help you establish a strong bond with your vehicle, ensuring it remains reliable and dependable without draining your wallet. So, let’s take a journey back in time and explore the wisdom of our automotive-savvy ancestors to unveil a host of valuable insights that you absolutely need to know.
Your car and your bank account will thank you for it!.
Extend the Lifespan of Your Wiper Blades: Simple Hacks for Clearer Windshields
As time goes by, wiper blades gradually lose their effectiveness in keeping your windshield clean.
However, there’s no need to rush to replace them just yet. With a few household items and a touch of effort, you can significantly extend the life of your wiper blades, ensuring they continue to provide clear visibility on the road. Follow these easy steps to rejuvenate your wiper blades and witness the remarkable improvement in their performance.
Clean the Windshield Base: Begin by using a quality window glass cleaner to thoroughly clean the area just beneath where the wiper blades rest on the windshield.
This step eliminates any accumulated grime and dirt, allowing the wiper blades to make better contact with the glass surface.
Employ the Power of Rubbing Alcohol: Grab a paper towel and dampen it with some rubbing alcohol.
Gently wipe the surface of the wiper blades with the dampened paper towel. This process effectively removes any built-up residue, dirt, and oils, which might be hindering their efficiency.
By following these straightforward tips, you’ll be amazed at the noticeable difference in how your wiper blades perform.
Enjoy clearer, streak-free visibility during rain or snow, and make the most out of your wiper blades before considering a replacement. With a little care and some DIY magic, you can drive confidently through any weather conditions without breaking the bank on new wiper blades.
Your wallet and your windshield will thank you!.
Ensuring Safe Rides: The Penny Test for Tire Treads

When it comes to road safety, one crucial aspect often overlooked is the condition of your tire treads.
Worn-out treads can significantly compromise your car’s ability to provide a secure ride. But fear not, there’s a simple and quick test you can perform to determine the state of your tire treads, affectionately known as the “Penny Test.”.
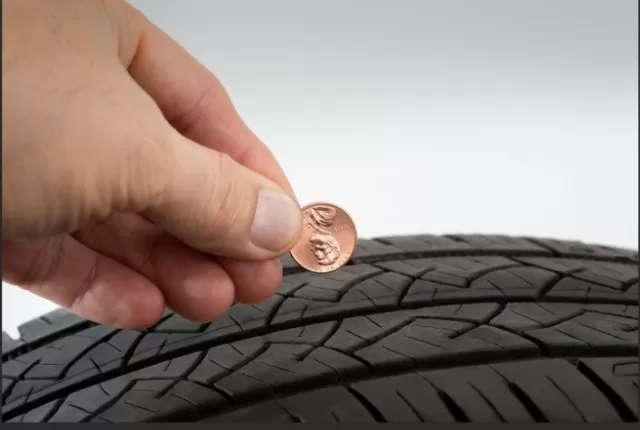
Here’s how it works: Take a penny and insert it into the tire tread with Abraham Lincoln’s head facing downwards.
If you find that his head remains entirely visible above the tread, it’s a clear sign that your tire treads are dangerously worn down, and it’s high time to invest in new tires.
By performing this straightforward assessment regularly, you can ensure that your tires maintain the optimal depth needed for proper traction on the road.
Adequate tire treads are essential, especially during adverse weather conditions, as they enhance grip and help prevent skidding and hydroplaning.
Your safety and the safety of others on the road depend on the condition of your tires.
So, take a moment to do the “Penny Test” and be proactive in replacing worn-out tires. It’s a small investment that guarantees significant returns in terms of road safety and peace of mind during your journeys.
Remember, a penny for your treads can save you from potential hazards on the road!.
Revive Your Headlights with Toothpaste: An Easy DIY Solution for Foggy Headlights
As your car ages, you might notice your once-crystal-clear headlights gradually becoming foggy or yellowed due to oxidation.
Fortunately, there’s a simple and cost-effective remedy to restore their shine – toothpaste! This everyday household item contains mild abrasives that can work wonders in clearing up the foggy surface of your headlights. Follow these easy steps to bring back the clarity and brightness to your car’s headlights:.
Start with a Clean Slate: Begin by thoroughly cleaning the headlights with a mixture of soap and water.
Remove any dirt, grime, or debris that might be present on the surface.
Apply Toothpaste: Take a soft cloth or microfiber towel and squeeze some toothpaste onto it.
Rub the toothpaste onto the wet headlight using gentle circular motions. The mild abrasives in the toothpaste will gently polish the surface and begin to remove the foggy or yellowed layer.
Maintain Adequate Lubrication: As you work, ensure to add more toothpaste and water as needed to keep the surface lubricated.
This prevents any potential scratching and ensures a smoother polishing process.
Rinse and Dry: Once you’re satisfied with the results, rinse off the headlight thoroughly with water.
Use a different clean, soft cloth to dry the headlight and reveal its renewed clarity.
Apply Headlight Sealant: To protect your Hard Work and maintain the restored brilliance of your headlights, consider applying a headlight sealant.
This sealant will act as a barrier against future oxidation, keeping your headlights clearer for a more extended period.
With this simple toothpaste treatment, you can bring back the original allure of your headlights and improve your visibility on the road.
Embrace the DIY spirit and enjoy the sense of accomplishment as you witness your foggy headlights transform into sparkling beacons once again!.
WD-40: Your Bug-Busting Solution for a Spotless Car

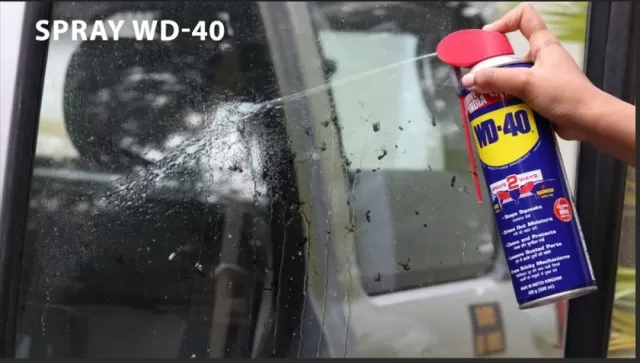
If you thought WD-40 was only handy for household tasks, think again! This versatile lubricant has a surprising use that will make cleaning your car a breeze – removing dried up, stubborn bugs from the front of your vehicle.
With just a can of WD-40 and a little effort, you can say goodbye to those unsightly bug remnants in no time. Follow these simple steps for a bug-free and immaculate car:.
Arm Yourself with WD-40: Grab that trusty can of WD-40 from your garage.
Its unique properties will work wonders in breaking down and loosening the dried-up bug splatters.
Apply the Magic Lubricant: Spray WD-40 generously onto the areas affected by bug residue.
Allow it to sit for approximately ten minutes. During this time, the WD-40 will work its magic, making it easier to remove the stubborn bugs.
Wipe Away with Ease: Take a sponge or a soft cloth and gently wipe away the loosened bug remnants.
You’ll notice how effortlessly they come off, thanks to the power of WD-40.
Embrace a Little Elbow Grease: Some particularly stubborn spots may require a bit more effort.
Don’t be afraid to apply a little elbow grease to ensure a spotless finish.
Rinse and Wash: After successfully clearing away the bugs, give your car a thorough rinse to remove any remaining WD-40 residue.
Then, proceed with washing your vehicle as you usually would, to leave it looking clean and shiny.
With this newfound application of WD-40, you can keep your car’s front end looking pristine and avoid the annoyance of stubborn bug stains.
Enjoy the satisfaction of a sparkling clean car, thanks to the wonders of this magical lubricant!.
*The information is for reference only.