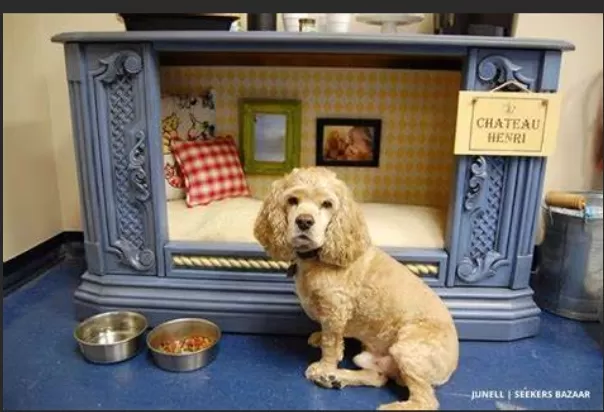
Transform an Old TV into a DIY Cat House. For cat owners seeking a creative and cozy retreat for their furry companions, repurposing an old TV into a unique cat house offers a fun and personalized solution. Rather than purchasing a standard cat house, consider transforming an unused vintage TV set into a stylish and comfortable abode for your pet.
Once the electrical components are safely removed from the TV, the opening where the screen used to be becomes the entrance for your cat. Now, it’s time to elevate the space to suit your feline’s tastes and needs. Start by covering a piece of plywood with decorative paper to add a playful touch (a fish pattern, for instance). This will create a welcoming interior for your cat.
To ensure comfort, consider using a cushion wrapped in fabric as a cozy bed inside the TV cat house. Additionally, attaching a scratch pad to the front can provide entertainment and help maintain your cat’s claws.
This DIY project not only gives your cat a unique and personalized space but also repurposes forgotten furniture in an eco-friendly manner. It’s a creative way to provide your feline friend with a cozy retreat they’ll love while adding a touch of whimsy to your home décor.
Materials and Tools for Upcycling a Vintage TV Set into a Pet Bed

To embark on the creative journey of transforming a vintage TV set into a cozy pet bed, you’ll need the following materials and tools:.
Materials:.
Vintage TV set.
Plywood.
Decorative wallpaper (consider peel-and-stick for easy application).
Cushion.
Fabric (for additional decorative elements).
Scratch pad (optional, for added pet-friendly features).
Tools:.
Wood cleaner.
Microfiber cloth.
Cotton swabs.
Screwdriver.
Staple gun.
These materials and tools form the foundation for repurposing and upcycling the vintage TV set into a comfortable and stylish pet bed.
Whether you’re adding decorative wallpaper, incorporating fabric for aesthetic appeal, or considering a scratch pad for your pet’s enjoyment, this DIY project promises a unique and personalized space for your furry friend.
Step 1: Dust the Exterior
Begin the transformation of your vintage TV set by ensuring a clean canvas.
Wipe down the exterior of the TV set using a dry cloth. This initial step removes dust and debris, providing a clear surface to work with as you embark on the creative process of upcycling the TV set into a pet bed. By starting with a clean exterior, you set the stage for a polished and well-executed final product.
Step 2: Remove the Electrical Components

Take your project to the next level by dismantling the TV set and transforming it into a pet-friendly haven.
Use a screwdriver to carefully remove the back cover of the TV set. This step involves disassembling the electrical components, leaving you with just the box of the TV set.
Exercise caution and ensure the TV set is unplugged before attempting this step.
Once you’ve successfully removed the electronic components, responsibly dispose of them by finding a local e-waste recycling facility. Proper disposal of electronics is essential for environmental sustainability.
With the electrical components removed, you’re now ready to move forward with the creative process of turning the TV set into a unique and cozy pet bed.
.
.
.
.
.
.
Step 3: Deep Clean the TV Set
Give the vintage TV set a Thorough Cleaning to ensure a pristine and polished foundation for your pet bed project.
Wood Cleaner Application: Spray the exterior of the TV set generously with wood cleaner.
This step helps to remove any lingering dirt, grime, or stains. Ensure even coverage across all surfaces.
Wiping with Dry Cloth: Use a dry cloth to wipe down the TV set, removing the wood cleaner along with any accumulated residue.
This step brings out the natural beauty of the wood and preps the surface for the next stages of the transformation.
Detail Cleaning with Cotton Swabs: For intricate or hard-to-reach areas where a cloth may not suffice, use cotton swabs.
Clean finer details, corners, or any areas that require more precision. This meticulous cleaning ensures every nook and cranny is refreshed.
By investing time in deep cleaning, you not only enhance the visual appeal of the vintage TV set but also create a hygienic environment for your pet’s new retreat.
Step 4: Decorate Plywood

Now, let’s infuse a touch of style into your pet’s new haven by decorating the plywood.
Prepare Plywood: Cut three pieces of plywood to fit the sides and back of your TV set.
These will serve as the walls of the pet house. Ensure that the dimensions are suitable for your specific TV set.
Choose Decorative Wallpaper: Select decorative wallpaper that complements your aesthetic vision.
Peel-and-stick varieties work well for this project as they are easy to apply and remove, allowing for flexibility in design choices.
Wrap Plywood: Carefully wrap each piece of plywood with the chosen decorative wallpaper.
Ensure a smooth and even application, eliminating any air bubbles or wrinkles for a polished finish.
Place Decorated Plywood: Position the decorated plywood pieces on the sides and back of the TV set.
This step instantly transforms the TV set into a stylish pet house, adding a personalized touch to the overall design.
By decorating the plywood, you not only enhance the visual appeal of the pet bed but also create a cozy and aesthetically pleasing space for your furry friend.
This step brings your creative vision to life, making the pet bed a delightful addition to your home decor.
Step 5: Make the Bed
Let’s ensure your pet’s comfort by creating a snug and inviting bed within the TV set.
Prepare the Cushion: Start by selecting a comfortable cushion that fits the dimensions of the TV set.
This will serve as the cozy sleeping area for your pet.
Wrap Fabric Around the Cushion: Choose a fabric that complements the overall aesthetic you’re aiming for.
Wrap the fabric around the cushion, ensuring a tight and secure fit. This step adds an extra layer of comfort and style to your pet’s bed.
Secure with a Staple Gun: Use a staple gun to secure the fabric in place.
Ensure that the fabric is taut and properly fastened to the cushion. This not only creates a neat and tidy appearance but also ensures durability.
Place the Cushion Inside the TV Set: Position the cushion at the bottom of the TV set.
This creates a plush and inviting bed for your pet to relax in. The cushioned base ensures your furry friend has a comfortable space to rest and unwind.
By completing this step, you’ve transformed the vintage TV set into a functional and stylish pet bed, providing a cozy retreat for your pet.
The combination of decorative elements and a comfortable bed makes this project a delightful addition to your home.
Step 6: Add Scratch Pad (Optional)
Enhance your pet’s experience by incorporating an optional scratch pad into the base of the TV set.
Select a Scratch Pad: Choose a scratch pad that fits well within the dimensions of the TV set.
This addition serves as an engaging feature for your pet, allowing them to indulge in natural scratching behavior.
Insert the Scratch Pad: Place the selected scratch pad into the base of the TV set.
This provides your pet with an additional element of entertainment and satisfies their instinct to scratch.
By including a scratch pad, you not only create a cozy bed for your pet but also offer an interactive and stimulating environment.
Step 7: Turn an Old Chair Into 2 Beautiful Jewelry Holders With This DIY Project
If you’re ready for another creative endeavor, consider repurposing an old chair into two stunning jewelry holders with this DIY project.
The transformation of everyday items into functional and aesthetically pleasing pieces adds a touch of uniqueness to your home decor.
*The information is for reference only.