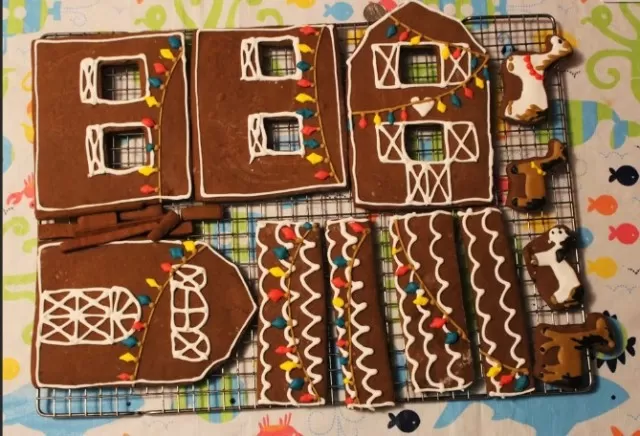
Create a Festive Gingerbread Ranch for the Holidays.This year, we’re taking a unique twist on the classic gingerbread house by creating a charming gingerbread barn that captures the essence of a real farm—complete with a hayloft and all! Instead of the traditional candy decorations, we’re opting for more wholesome and natural accents that evoke the rustic charm of the countryside. Think sunflower seeds, a variety of nuts, pretzels, and cereal to create a delightful and authentic farm-like atmosphere.
So, roll up your sleeves and plow ahead into this exciting cookie construction adventure! Let the kids join in on the fun and give them the freedom to nibble on the treats as they help you decorate the gingerbread barn. It’s a wonderful opportunity to unleash their creativity and imagination while bonding over this delicious and hands-on project. Together, you can create a gingerbread barn that’s not only a feast for the eyes but also a delightful treat for the taste buds. So, gather the family, embrace the spirit of the season, and enjoy crafting a gingerbread barn that’s sure to be a hit!
Crafting Gingerbread Magic – A Detailed Recipe

For this enchanting gingerbread project, you’ll need to Be Prepared for the sweet journey ahead.
Due to the substantial amount of gingerbread dough required, you’ll find it more manageable to make it in two separate batches. Additionally, the extensive number of shapes involved may demand that you chill and bake them in stages to maximize your refrigerator and oven space.
Here are some helpful tips for achieving the best results:.
Use canned goods and clean T-pins or sewing pins to hold the gingerbread barn together while the icing sets.
T-pins are especially effective for securing the roof pieces. Be sure to remove the pins once the icing has completely dried.
If you have trouble finding mini ice cream cones for the trees, a serrated knife can be used to gently trim about an inch from the bottom of regular sugar cones to create a suitable alternative.
Gingerbread Recipe:.
4 sticks (1 pound) of unsalted butter, softened.
2 cups packed light-brown sugar.
2 tablespoons plus 2 teaspoons ground ginger.
2 tablespoons plus 2 teaspoons ground cinnamon.
1 tablespoon ground cloves.
1 tablespoon kosher salt (we recommend Diamond Crystal).
2 teaspoons baking soda.
1 teaspoon baking powder.
4 large eggs at room temperature.
2 cups unsulfured molasses.
12 cups unbleached all-purpose flour, plus extra for dusting.
Royal Icing Recipe:.
1 pound of confectioners’ sugar, plus more if needed.
5 tablespoons meringue powder.
Decoration:.
Candy-coated sunflower seeds.
Red fruit-leather rolls (like Joray).
Pretzel sticks and rods.
Sliced skin-on almonds.
Raw shelled pistachios, blanched and skinned.
Mini ice cream sugar cones.
Big-biscuit shredded-wheat cereal.
Raw pepitas.
Unsweetened shredded coconut.
Brown or black candy-coated Jordan almonds.
Granola.
With these detailed instructions and a bit of creativity, you’ll be able to create a gingerbread masterpiece that will surely impress both the eyes and the taste buds.
Creating a Gingerbread Barn – Step by Step

Here’s a detailed breakdown of how to make a delightful gingerbread barn:.
For the Gingerbread:.
In a stand mixer, beat 2 sticks of butter, 1 cup of brown sugar, 4 teaspoons each of ginger and cinnamon, 1 1/2 teaspoons each of cloves and salt, 1 teaspoon of baking soda, and 1/2 teaspoon of baking powder on medium-high speed until light and creamy (approximately 2 minutes).
Add 2 eggs and 1 cup of molasses and beat well.
With the mixer on low speed, gradually add 6 cups of flour and beat until well combined.
Divide the dough into 4 equal pieces.
Roll out each piece between lightly floured pieces of parchment paper to a thickness of 1/8 inch. Place the dough sheets on a flat, non-warped baking sheet, then refrigerate them until firm for at least 1 hour.
Repeat this process to create a second batch of dough, for a total of 8 sheets.
For Cutting the Gingerbread:.
Print and cut out gingerbread-barn templates.
Working with one sheet of dough at a time, keep the rest refrigerated. Place the template shapes on the dough and use a pastry wheel or sharp knife to cut out shapes: 1 floor panel, 2 side panels, 2 front/back panels, 2 upper and 2 lower roof panels, 1 barn door, and 1 wreath.
After cutting each piece, return it to the refrigerator to chill.
Preheat the oven to 350°F.
On the front panel, cut out a 3-by-1-inch door at the bottom center, a 2 1/2-by-1-inch long window near the top, and score two 2-inch windows below, cutting all the way through the dough but not removing it. Cut out 4 small panes from each scored window.
Transfer the pieces to flat parchment-lined baking sheets and freeze for 30 minutes or refrigerate for 1 hour.
Bake the gingerbread pieces until they are firm and begin to brown around the edges, which takes about 20 to 25 minutes (or 15 to 20 if baking from the refrigerator).
Transfer them immediately with parchment to wire racks and let them cool completely. If the cookies become misshapen, trim the edges with a serrated knife while they are still warm to match the templates.
For the Royal Icing:.
Beat confectioners’ sugar, meringue powder, and 5 to 6 tablespoons of water on low speed until smooth, about 6 minutes.
Transfer 2 tablespoons of icing to a piping bag fitted with a very small round tip and transfer the remaining icing to a piping bag fitted with a 1/4-inch tip.
Decorating the Gingerbread

Pipe icing from the bag with the smallest tip to attach green sunflower seeds to the baked wreath, leaving a small circle uncovered in the center.
Create decorative bows by folding pieces of fruit leather into loops and securing them to straight pieces.
Attach these bows to the bottom of the wreath with royal icing.
On the front panel, pipe a “string of lights” along the top edge and attach candy-coated sunflower seeds to make “bulbs.
” Allow the icing to harden completely.
Secure the gingerbread door to the right of the door opening using icing.
Attach two pretzel sticks to the door in an X shape and add a pretzel rod above the door. Place the hardened wreath between the windows.
Let the front panel harden completely.
Place the floor panel on a parchment-covered board with shorter sides facing the front and back.
Pipe thick lines of icing along the outside edges of the floor (long sides) and adhere side walls. Let it harden completely.
Pipe thick lines of icing over the front and back edges of the floor and up the sides of the walls.
Attach the front and back wall pieces to the floor and side walls. Remove excess icing with a butter knife or small offset spatula.
Let it harden completely, which may take at least 2 hours.
Once the walls are completely dry and solid to the touch, attach the roof panels one side at a time, using lines of icing.
Secure the roof panels with T-pins. Pipe a thick line of icing down the roof peak to hold the panels together.
Allow it to harden completely, which may take at least 2 hours.
With these step-by-step instructions, you can create your own charming gingerbread barn that’s perfect for the holiday season!.
*The information is for reference only.