Crafting a Gingerbread House Facade: Step-By-Step Guide.Creating a gingerbread house can be a delightful holiday tradition, but it often demands time and effort. From making the dough, rolling, cutting, baking, and assembling all the pieces, it can take several days to complete the project with care. However, for those with a tight schedule, there’s a fantastic shortcut that offers a solution: the gingerbread house facade.
A gingerbread house facade is precisely what it sounds like—a simplified version of the gingerbread house, focusing solely on the front, the part that’s visible to onlookers. This approach greatly reduces the need for extensive cutting and baking, and it requires far fewer pastry bags to pipe the “cement” that holds the structure together. In essence, you’re creating one large gingerbread cookie that serves as the front face of the house.
Just like with a traditional three-dimensional gingerbread house, the design possibilities for a facade are limitless. You can replicate the appearance of your own home or craft an urban landscape featuring geometric apartment buildings. Concentrating your efforts on the facade allows you more opportunities to showcase the character and personality of your gingerbread house. You can get as creative and ornate as you desire. You’ll also find instructions for crafting caramel syrup windows and attaching gingerbread shutters with icing, giving the impression that they are slightly ajar to let in the sweet imaginary breezes.
Another advantage of the “flat” gingerbread house is that it’s much easier to display than a larger, three-dimensional construction. You can lean it on your mantle, place it on a bookshelf, or use it as a charming backdrop for a hot cocoa bar during your festive gatherings.
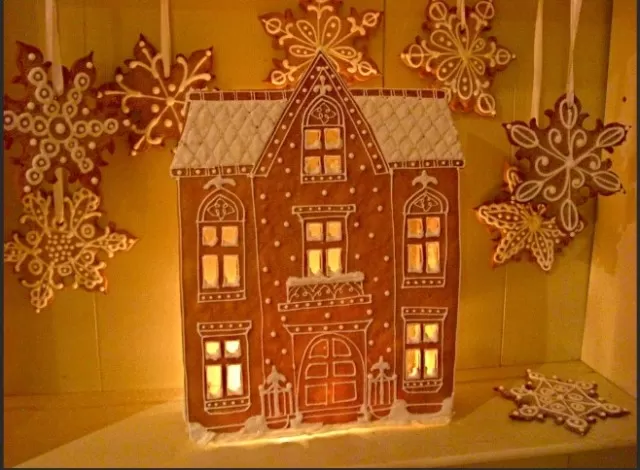
The gingerbread facade featured here is based on a photograph of the actual house where it’s showcased. Two supports, cut from gingerbread and attached at the back, help keep the facade upright, adding a touch of architectural stability to your edible masterpiece.
Crafting a Gingerbread Facade Template

To bring your dream gingerbread house to life, start by creating a precise template of the building’s facade.
Follow these steps to ensure your gingerbread rendering is a perfect match:.
Enlarge the Image: Begin by using a photocopier to enlarge a photograph or drawing of the desired building to the size you wish to replicate in gingerbread.
Ensure that the enlarged rendering will comfortably fit on your largest baking sheet.
Tracing the Design: Place a sheet of tracing paper over the enlarged image and meticulously trace all the exterior details and features of the house.
This should include doors, windows, eaves, shutters, shingles, and any other architectural elements you want to include in your gingerbread creation. These tracings will serve as guidelines for icing details later on.
Creating a Sturdy Template: Transfer the traced design onto a sheet of card stock.
Cut out the card stock to create a sturdy template that will serve as the foundation for your gingerbread facade.
Designing Supports: To provide structural integrity, enlarge the template to match the height of the facade you’re envisioning.
Trace this onto card stock and cut it out to create support structures.
A helpful tip to keep in mind: If you plan to use molding clay for creating windowpanes, make them just before use.
Storing them can make them sticky and challenging to work with. Additionally, hold off on making the Caramel Syrup until you have your molds ready to go.
Following these steps will help you prepare a solid foundation for your gingerbread masterpiece.
How to Construct the Gingerbread Facade
Start by preheating your oven to 350°F (175°C).
Roll out the gingerbread dough on a Silpat or parchment paper to approximately 1/4 inch thickness, and chill the dough in the refrigerator until it becomes firm, which should take around 1 hour. Once firm, lightly sprinkle some flour over the top of the dough.
Place the previously created facade template over the chilled dough, and use a paring knife to carefully cut out the shape.
Remove any excess dough from around the template, but make sure to save the scraps for later use. Use a small utility knife to carefully cut out the windows from the facade.
Collect the dough scraps, re-roll them, and cut out two shutters and two supports.
Bake these pieces according to the instructions provided in your gingerbread recipe. Once baked, allow the pieces to cool completely.
Next, place the Silpat with the house pieces on a baking sheet, and bake in the preheated oven.
Be sure to rotate the baking sheet halfway through the baking time, which should be around 18 minutes, or until the pieces are just beginning to brown. Allow the pieces to cool completely.
After baking, place the template over the baked gingerbread pieces.
Use a utility knife to lightly score along the roof lines, shingles, and door, creating guides to follow when piping icing onto the gingerbread. The gingerbread pieces can be stored on baking sheets, covered with plastic wrap, for up to 1 week at room temperature until you’re ready to assemble the facade.
Decorating the Gingerbread Facade with Icing: Step by Step

Prepare Royal Icing and fill a pastry bag, fitted with a small plain tip (No.2).
Begin by piping the Royal Icing to outline any areas you intend to cover completely, such as eaves or turrets.
Make use of the previously scored lines on the gingerbread as your guides. Allow this outline to set for 5 to 10 minutes.
While the outline icing is setting, create the shingle effect by piping Royal Icing along the scored lines, using the same small plain tip (No.2).
Now, switch to another pastry bag fitted with a small plain tip (No.3).
Use this to draw tight zigzag patterns within the outlined areas, filling them in (a technique known as flooding).
While the flooding icing is still wet, evenly spread it with an offset spatula to ensure a smooth and consistent surface.
Once the icing is completely dry, use the No.
2 tip to pipe decorative lines or other intricate details on the flooded areas to enhance the facade’s overall look.
Finally, decorate the shutters as desired, adding any finishing touches or embellishments to complete the gingerbread facade’s charming appearance.
With these icing techniques, your gingerbread creation will not only be a delicious treat but also a stunning work of art that can serve as a centerpiece for your holiday celebrations.
Crafting Windows for the Gingerbread Facade: A Step-by-Step Guide
Begin by rolling out the molding clay to a 1/4 inch thickness on a Silpat or parchment paper.
Measure the dimensions of the windows on the gingerbread house.
To account for ease of installation, add an additional 1/2 inch to each measurement.
Use a utility knife to cut out molds from the rolled-out clay, following the measurements you previously took.
Prepare the Caramel Syrup according to your chosen recipe, and carefully pour it into the clay molds.
Allow the syrup to set within the molds until it’s completely dry, which should take around 1 hour.
Once the syrup is dry, gently lift the clay away, leaving the windowpanes behind on the Silpat.
Completing the Window Installation and Adding Finishing Touches

Allow the windowpanes to set after they’ve been removed from the clay molds.
Using Royal Icing, apply a layer of icing to the back of the gingerbread facade where the windows will be placed.
To do this, pipe a line of icing around the back of the window frames, approximately 1/4 inch from the edge.
Carefully press the windowpanes into the icing-coated window frames, ensuring they fit snugly and securely.
Allow the icing to dry completely, which typically takes about 1 hour.
Turn the gingerbread facade right side up to prepare for the final embellishments.
If desired, use Royal Icing to decorate the windows further, adding decorative details to enhance their appearance.
To add a sparkling touch to your gingerbread creation, lightly brush some un-iced areas of the gingerbread with an egg wash.
Then, generously sprinkle nonpareils or sanding sugar over the wet egg wash. Work swiftly, as egg whites dry quickly.
Allow the gingerbread to sit for about 20 minutes, allowing the embellishments to set.
Afterward, gently brush off any excess nonpareils or sanding sugar.
By following these steps, your gingerbread creation will not only have beautiful windows but also be adorned with a delightful sparkling finish, making it a true work of art and a delectable centerpiece for your holiday celebrations.
*The information is for reference only.